Column Chromatography: Column
Assembly
General Assembly
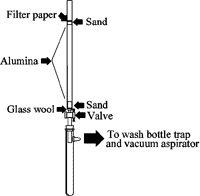
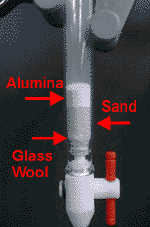
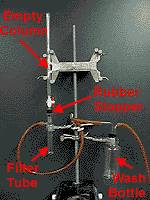 These
diagrams display the assembled column chromatography apparatus. In the diagram
at left, the layers
of column packing material are labeled. Note the lower layer of glass wool that
protects the stopcock
valve assembly from the alumina and sand column packing material. The sand layers
are each 1 cm thick. Make the alumina layer as long as possible but remember
to leave the last 4-5 cm of the column open. Also note the wash bottle trap used
to isolate the apparatus from the domestic water supply.
Packing the
Column
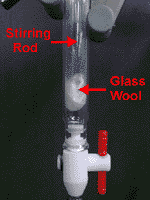 Using
a stirring rod, push a small wad of glass wool to the bottom of the empty column.
The glass wool prevents the sand and alumina from entering and
consequently
destroying the valve at the bottom of the column. Using a long stirring rod,
gently pack the glasswool until it covers the hole leading to the valve
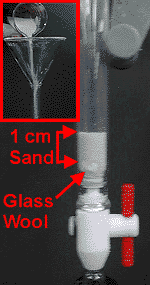
Pour sand into the column until
a 1 cm layer
has formed. Use a funnel to direct the sand into
the column. The sand forms the foundation for the alumina layer that will be
added in the next step.

Add alumina
to the column
until you have formed a layer approximately 10 cm tall
Use a funnel and proceed carefully. Don't overfill the column.
There must
be enough room for a final sand layer and empty space for the introduction of
liquid samples. Avoid breathing the alumina dust.

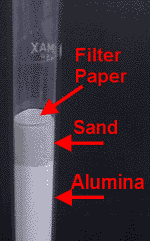
Create another sand layer on
top of the alumina
and position a small, circular piece of filter paper over the sand.
The filter paper keeps the sand layer from being disturbed as
liquids are
poured into the top of the column.
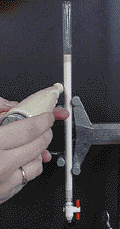
Pack the column by GENTLY holding
an engraving
tool up alongside the side of the column.
The vibrations will accelerate settling of the column contents.
(ie. some settling may occur during shipping). If the column is not
properly packed,
open spaces or gaps in the alumina will develop as solvents are introduced in
subsequent steps

 These
diagrams display the assembled column chromatography apparatus. In the diagram
at left, the layers
of column packing material are labeled. Note the lower layer of glass wool that
protects the stopcock
valve assembly from the alumina and sand column packing material. The sand layers
are each 1 cm thick. Make the alumina layer as long as possible but remember
to leave the last 4-5 cm of the column open. Also note the wash bottle trap used
to isolate the apparatus from the domestic water supply.
 Using
a stirring rod, push a small wad of glass wool to the bottom of the empty column.


